Chapter One – John Britty North – The man and his story.
Chapter Two – The Land Issue.
Chapter Three – Building the Railway Siding
Chapter Four – Building the Bankhead
Chapter Five – The incline and winder
Chapter Six – The Tramway
Chapter Seven – The Mine
*********************************************************************************************************
Chapter Three – Building the Railway Siding
In 1882 J B North was setting up “The Shoots”, the area where the coal from his mine in the Jamison Valley would be transshipped into NSWGR rail trucks to be railed to Sydney.
This involved major earthworks and building a bridge to carry the Great Western Road across a 10-metre-deep railway cutting.
Initially starting with a steeply sloping site, a large bench had to be cut to allow for the 3 railway sidings to be under the chutes. Then the siding had to be extended going slightly up hill around the hill to store the empty trucks. It was about 125M long.
The cutting under the Great Western Road [GWR] was about 100M long and 10 metres deep. Traffic on the GWR had to be maintained while the bridge and cutting were built so I surmise that the bridge was built “on the ground” beside the used road, then the road diverted over it while the cutting was dug out beneath it.
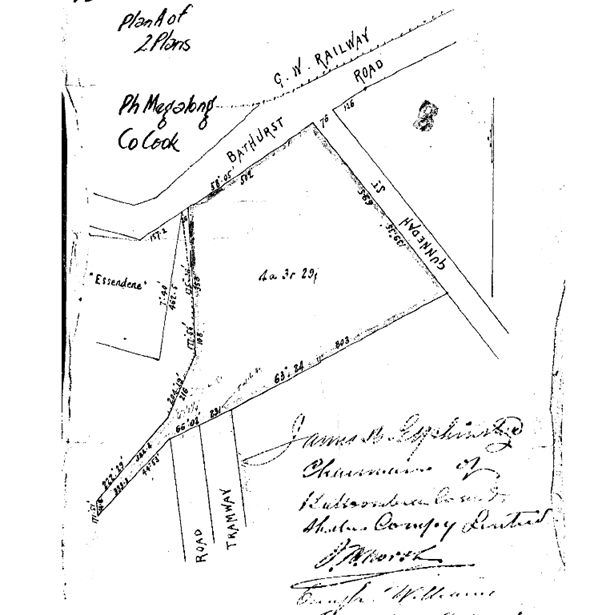
Map “A” shows the siding extending under the road reserve until it reached the Northern boundary of Por 64. It also shows the bridge and a level crossing across the NSWGR just to the NW of the bridge. Also showing is the “Katoomba Coal Co steam sawmill” just over the boundary of Por 64/63. In today’s Lot 4 DP 707.
The next trick was to build a flat to be the upper terminus of the tramway, then two metres above that a smaller flat to accommodate the return turnwheel. Ultimately by 1889 this had to also hold the clip pulley and its driving steam-engine-boiler package with a shed built over it.
Next the tramway had to pass under the railway siding on its way to the unloading flat.
All this had to be carved out of a sloping hillside covered in 30M high Mountain Ash trees.
We have a few maps of the siding layout, two from “The Shale Railways of NSW” by Eardley and Stephens, which are reasonably accurate representations of the layout. Maps B & C.
Then we have the Katoomba North’s subdivision map which does shows the cutting across the road as a dark blob! Map D.
Then we have this Lands Dept map showing the siding after 1887, when Katoomba Coal & Shale Co was created and the 5-acre lot was surveyed as a separate part of the mining operation. Map E. A more detailed edition of this map is in the lease itself. Map F.
We also have some NSWGR drawings of the siding layout. Maps G & H.
Two documents from the Archives of the Australian Railway Historical Society detailing the operational procedures for the siding, K & L. Comparisons of Eardley’s drawing and the NSWGR drawings show a few differences, possibly resulting from different time frames. The chutes (shoots) are different in Eardley’s drawings. The NSWGR drawing clearly shows two shoots one covering all three siding loops, and the other just on one side. This one was for the coal coming back up the recovery road. The longer went right across the three loop sidings so that excess coal or shale could be “shot” down the hill to be brought back up the recovery road when needed. This one is also shown narrower at the end. This outer loop was used to propel empty trucks up to the head of the siding and trucks were not loaded from the shoot on this loop. Eardley shows the “screens” as a “T” shaped building. He has incorrectly combined the shoot with the “Power House” that contained the boiler/steam engine for the clip pulley. The “screens” were above the shoots which separated the large coal from the “nuts” or small coal. There was a miner’s strike concerning the size of the mesh on these screens. Eardley also includes a Weighbridge which does not appear in these G & H drawings. I have an inquiry in to ARHS to see if there is an indication of the weighbridge on the original drawing, as it cannot be seen in my scan.


NORTH’S SIDING
A catch point has been provided in the siding near the overbridge and is fitted with a bracket lock.
The key to unlock same will be kept in possession of the Station Master at Katoomba. When it is
required to work this siding the key to unlock this catch point must be obtained from station and
returned when shunting is completed. Drivers must be careful in going along this siding not to run
through the catch points until they have been unlocked. Trucks for loading shale at the siding must
always be left inside the catch points. In shunting this siding, the trucks must always be propelled
when proceeding to the siding from Katoomba Station and the engine also kept in front on return
journey.
Acknowledge receipt by first train
Sydney 17th September 1901. H Richardson
Superintendent of the Lines.


*****************************************
Construction of the Siding
My problem was to figure out how JBN had had the siding built on his Por 64.
I was operating under the misapprehension that NSWGR had to build the siding across his property.
But 10 years before in 1870 Selfe had built a siding across private property to service the Hartley Shale Mines. His contact with Mr Elphinstone would have been a good source for contractors.
In 1880 JBN was well on his way to building the Katoomba Coal Mine:-
SMH 5 Feb 1880 http://nla.gov.au/nla.news-article13455224

Now this is for “Building-in” of a large steam boiler. Does “building-in” mean the shed enclosing the boiler, or the supporting stonework for the boiler? Assuming that this is the 2 boilers for the incline and the tramway.
Notwithstanding that various land ownership issues had not been officially concluded, he had started on both ends of the Tramway:-
Sydney Daily Telegraph 13 Oct 1880 http://nla.gov.au/nla.news-article238295693

By December 1880 it seems that the boilers were working and the incline was almost operational.
And this from Australian Town & Country 18 Dec 1880:-

But no! It seems that the first ads were unsuccessful, or the Contractors failed to complete. By January 1881 JBN is recruiting labourers himself to start the earthworks for the upper end of the Tramway. These ads in early 1881 show what happened:-
SMH 6th Jan 1881 http://nla.gov.au/nla.news-article13475522
TENDERS required for 4000 yards Mullock and Soft Sandstone, open cutting at Katoomba J B NORTH
Assuming that this was for four thousand cubic yards to be excavated, this is enough to cut and bench the area for the sidings and cut the cutting back into the hill.
Next we have the cutting through the GWR viz:-
SMH 18th Feb 1881 http://nla.gov.au/nla.news-article13483799

Next task is to clear the tramway:-
SMH 26th Apr 1881

I assume that the plan was as follows: –
1: Erect the sawmill and cut the Mountain Ash on the shoots site and the dead-end siding site.
2: As the timber becomes available, sawmill can start cutting into timber for shoots and highway bridge. etc..
[ Beware research Rabbit Hole! During 1879 JBN is trying to sell a sawmill, Viz:-

Could it be his? Was he trying to offload it to an operator? Maybe he sold it to Mr. Williams, who Mr. Henderson was suing and bankrupted in 1883? Does this mean that Mr Henderson became the owner of the sawmill? I’m not convinced.]
3: Cut and bench the shoots area.
4: Cut the dead-end siding and build the GWR bridge from the sawn timber. Start digging the GWR cutting under the standing bridge which is now in use and erecting the shoots and overflow chutes from the cut timber.
5: Erect siding bridge over the tramway cutting.
6: Clearing of the tramway route.
There are no further ads for any work on the Tramway or the incline and winder. The concrete pit for the winder footing was a unique design. Mixing concrete in 1881 was not a skill enjoyed by the common labourer! The 60 foot high, square brick chimney and associated underground flues, was also a specialist task. No ads for the tunneling necessary to widen the fissure for the incline, cut and benching the approaches, or for the cutting through solid rock for the tensioning trolley for the tramway, the substantial earthworks for the Tramway and the huge Trestle known as Hogans Bridge up to Stuarts Road.
I surmise that all these works were carried out under contracts issued by Norman Selfe, using his existing list of suitable people.
The next ad is interesting: –
SMH Th 12th May 1881
SHIPS’ WIRE ROPE, second hand, wanted. Apply to J. B. North, 105, Pitt-street, Sydney.
Maybe this was used for the suspension bridge on the Tramway between Stuarts and Wellington Rd??.
These four lengths of wire rope are still laying in place across the headwaters of Katoomba Creek between today’s Stuarts and Wellington Roads. I was troubled to explain how obviously second-hand rope could have been used for the suspension bridge in 1881, if JBN’s incline was the source, as the incline could not have been doing much work even if it had been operable by then, enough to wear ropes and discard them so that they could be used for the bridge.

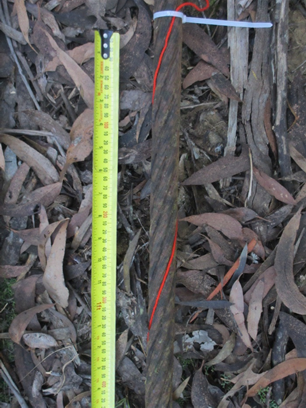
This piece of 6/7 Langs lay one and a quarter inch wire rope is onsite at the suspension bridge. It is plainly second hand evidenced by the flattening of the wires. The remaining tiny pieces of lubricant can still be seen between the strands.
Great Western Road – Road Bridge
The road bridge over the railway cutting gradually became a noteworthy item, with comments about its state of repair. It had been built in 1882 from locally cut Mountain Ash, and probably designed by Norman Selfe. In 1889 officers from the “Roads and Bridges Department” inspected the bridge, but nothing was done. In 1889 and 1890 Council moved motions concerning the bridge.
In 1894 Katoomba Council took over responsibility for six miles of the Great Western Road which included the bridge. AKO&M refused to have anything to do with it, as their lease from JBN was for the mine infrastructure and mineral seams. The legal obligation of bridge failure lay with Council. Eventually the State Government agreed to pay for the rebuild of the bridge and tenders were called in Jan to March 1894. The lowest tender was from J Hawkins for £642/4/6 which was accepted. In the tender documents the bridge was mostly called “North’s Crossing” or “North-siding Bridge”.
In 1910 Messers Jones Brothers, Coal Merchants of Sydney, purchased from J B North the slack Coal and Shale which was lying down the hill from the Shoots to the Recovery Road. Many “thousands of tons have been washed away by storms [probably an exaggeration] but 3000 to 4000 tons are remaining”. They erected “an engine” [probably a traction engine equipped with a winch], installed a temporary incline and skip, shoveled the slack into the skip, [a difficult task on the steep and slippery slope] and winched the slack up the hill, then shoveled into horse drawn drays to be transferred to the Railway Station [probably to the Goods Yard] then shoveled into railway trucks for transshipping to Sydney. They did a good job, as there is very little slack there today.
In 1918 a gang removed the rails and sleeper from the siding, which by then extended all the way to Katoomba Station, as curve improvements in 1896 had made it necessary. A 1907 report stated that “the trade from North’s Siding had fallen to nil”.
In 1922 Council made inquiries as to Council’s power to “fill in the old tram cutting”. In 30 years, it had been forgotten that it was a NSWGR siding. In 1924 the appointment of a Mr Heffernan as Council Engineer brought the issue of the deteriorating bridge to a head, and he had the cutting filled in with 400 tons of fill, complete with road widening, and so the bridge disappeared at a further cost of £550.

